
Introduction
Have you ever wondered how to pronounce the word "fixed"? It's a common word in the English language, but its pronunciation can be tricky for non-native speakers. In this article, we will guide you through the correct pronunciation of "fixed" and give you some tips to improve your pronunciation skills.
The Correct Pronunciation of Fixed

The correct pronunciation of "fixed" is "fikst." It is pronounced with a short "i" sound, like the word "sit," followed by a "k" sound and then a "st" sound. The stress is on the first syllable, "fikst."
Common Mispronunciations

Non-native speakers often mispronounce "fixed" by pronouncing it with a long "i" sound, like the word "eye," or by stressing the second syllable instead of the first. Some common mispronunciations of "fixed" include "feekst," "fiksed," and "fik-sted."
Tips to Improve Your Pronunciation Skills

If you're struggling with the pronunciation of "fixed" or any other English word, here are some tips to improve your pronunciation skills:
1. Listen carefully: Pay attention to how native speakers pronounce words and try to imitate their pronunciation.
2. Practice regularly: Practice saying words out loud on a regular basis to improve your pronunciation.
3. Record yourself: Record yourself saying words and listen to the recording to identify areas where you need to improve.
4. Use pronunciation apps: There are many pronunciation apps available that can help you improve your pronunciation skills.
Conclusion
Pronouncing "fixed" correctly may seem like a small detail, but it can make a big difference in how you are perceived when speaking English. By following the tips outlined in this article, you can improve your pronunciation skills and speak English more confidently.
Related video of How To Pronounce Fixed
English pronunciation can be a bit tricky, especially when it comes to words that sound similar but are spelled differently, such as "difference." In this article, we will guide you on how to pronounce "difference" correctly in relaxed English language.
What is "difference"?

"Difference" is a noun that means the way in which two or more things are not the same. It can also refer to the result of subtracting one number or quantity from another. For example, "There is a big difference between a cat and a dog," or "The difference between five and two is three."
How to pronounce "difference"
The word "difference" is pronounced as "dif-ruhns" with the stress on the first syllable. Let's break it down:
- The "di" sounds like "duh."
- The "f" is pronounced like "ff."
- The "er" sounds like "uh."
- The "en" sounds like "n."
- The "ce" sounds like "ss."
Put them all together, and you get "dif-ruhns."
Practice makes perfect

The best way to improve your pronunciation is to practice it as often as possible. Here are some tips to help you:
- Listen to native speakers and try to imitate their pronunciation.
- Record yourself saying the word and compare it to the correct pronunciation.
- Repeat the word several times until you feel confident.
Sounds similar but different

English has many words that sound similar but are spelled differently and have different meanings. Here are some examples:
- Accept vs. Except
- Affect vs. Effect
- Adverse vs. Averse
- Compliment vs. Complement
- Desert vs. Dessert
Knowing the difference between these words and how to pronounce them correctly can improve your English skills and help you communicate more effectively.
Common pronunciation mistakes

Here are some common mistakes that English learners make when pronouncing "difference" and how to avoid them:
- Pronouncing the "f" like a "v."
- Stressing the wrong syllable, such as "dif-frence" instead of "dif-ruhns."
- Pronouncing the "ce" like a "ch," such as "dif-rench" instead of "dif-ruhns."
Be aware of these mistakes and practice the correct pronunciation to avoid confusion and improve your communication skills.
In conclusion
Pronouncing "difference" correctly is an essential part of English communication. Remember to stress the first syllable and pronounce each sound correctly. Practice often, and be aware of common mistakes to improve your pronunciation skills. Knowing the difference between similar-sounding words can also help you communicate more effectively. Now, go ahead and practice saying "difference" out loud!
Related video of How To Pronounce Difference

Ate is an ancient Greek goddess of mischief, delusion, and ruin. She is often depicted as a winged figure with a wreath of thorns on her head. Her name is pronounced as “ah-tay” in English, but the correct Greek pronunciation is slightly different.
Understanding Greek Pronunciation

The Greek language has a different alphabet and pronunciation system compared to English. The Greek alphabet has 24 letters, and each letter has a distinct sound. Some sounds in Greek do not have an equivalent in English, so it may take some practice to get the pronunciation right.
How To Pronounce Ate in Greek

The correct pronunciation of Ate in Greek is “ah-teh”. The “ah” sound is similar to the “a” sound in the word “father”. The “teh” sound is similar to the “te” sound in the word “ten”. When pronouncing Ate, make sure to emphasize the first syllable and pronounce the “e” sound at the end of the word.
Other Greek Goddess Pronunciations

If you are interested in Greek mythology, here are some other Greek goddesses and their correct pronunciations:
- Athena - ah-thee-nah
- Aphrodite - af-roh-dee-tee
- Artemis - ar-teh-miss
- Demeter - dee-mee-ter
- Hera - heh-rah
- Hestia - hes-tee-ah
- Persephone - per-seh-foh-nee
Practice Makes Perfect

Pronouncing Greek words and names may feel challenging at first, but with practice, you can improve your pronunciation. Listen to audio recordings of Greek words and repeat them out loud. You can also enroll in a Greek language course or hire a tutor to help you improve your pronunciation.
Conclusion
Pronouncing Ate, the Greek goddess of mischief, correctly is “ah-teh”. Remember to emphasize the first syllable and pronounce the “e” sound at the end of the word. With practice, you can master the pronunciation of other Greek goddesses as well. Keep practicing and have fun exploring the world of Greek mythology!
Related video of How To Pronounce Ate Greek Goddess

Winter weather can be a hassle for drivers, especially when it comes to dealing with frozen windshield wipers. If you live in a region with cold temperatures, you may have experienced the frustration of trying to clean your windshield when your wipers are frozen stiff. But don't worry, there are steps you can take to prevent your windshield wipers from freezing.
1. Park in a Garage or Undercover Area
Parking your car in a garage or undercover area is the easiest way to prevent your windshield wipers from freezing. When your car is protected from the elements, your windshield wipers will stay dry and won't freeze overnight. If you don't have access to a garage or undercover area, try to park your car in a sheltered spot, such as under a tree or near a building.
2. Lift Your Wipers

If you can't park your car in a garage or undercover area, lift your windshield wipers off the windshield before it gets too cold outside. This will prevent them from freezing to the windshield and make it easier to clean your windshield in the morning. Be careful not to damage the wiper arms when lifting them off the windshield.
3. Cover Your Windshield

Another way to prevent your windshield wipers from freezing is to cover your windshield with a car cover or a tarp. This will protect your windshield and wipers from snow and ice, and make it easier to clean your windshield in the morning. Make sure the cover is securely fastened to your car to prevent it from blowing away in the wind.
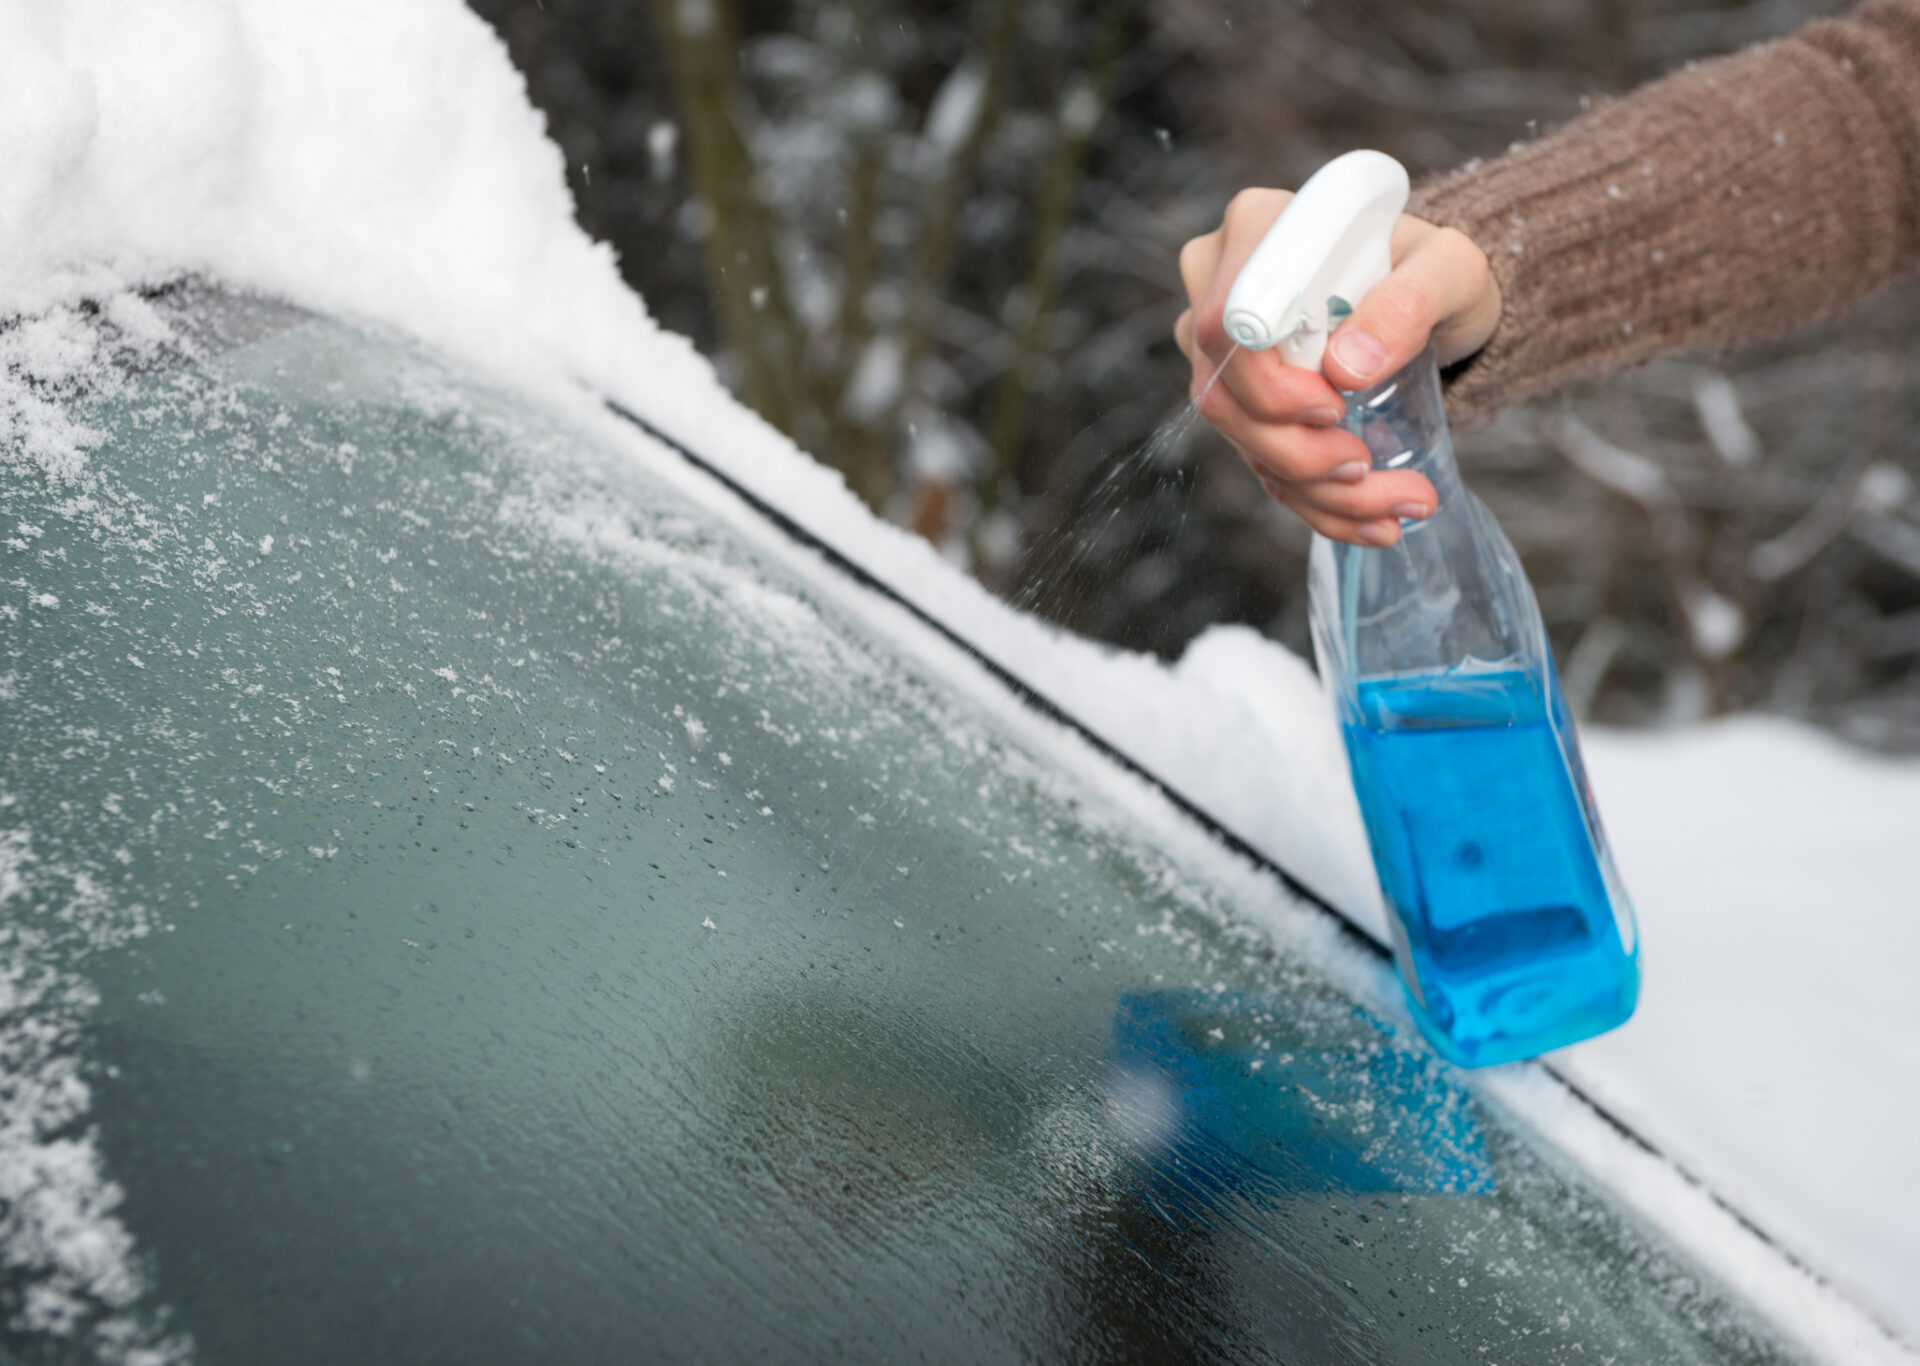
4. Use a De-Icer

If your windshield wipers are already frozen, don't try to force them. Instead, use a de-icer to melt the ice around the wipers and loosen them up. You can use a commercial de-icer or make your own by mixing one part water with two parts rubbing alcohol. Spray the de-icer on the windshield and let it sit for a few minutes before trying to move the wipers.
5. Turn Off Your Wipers Before Turning Off Your Car

Before you turn off your car, turn off your windshield wipers and make sure they are in the parked position. This will prevent the wipers from freezing to the windshield and make it easier to clean your windshield in the morning. If your car has an automatic wiper system, make sure it is turned off before turning off your car.
6. Use a Windshield Washer Fluid with De-Icer

Using a windshield washer fluid with de-icer can also help prevent your windshield wipers from freezing. The de-icer in the fluid will melt any ice or snow that accumulates on your windshield and make it easier to clean your windshield in the morning. Make sure to check the freezing point of the washer fluid and use a fluid that is appropriate for the temperatures in your area.
7. Don't Use Hot Water

Whatever you do, don't use hot water to melt the ice around your windshield wipers. Pouring hot water on a cold windshield can cause it to crack or shatter, which can be dangerous and expensive to repair. Stick to using a de-icer or scraper to remove any ice or snow from your windshield.
8. Keep Your Windshield Clean

Keeping your windshield clean can also help prevent your windshield wipers from freezing. A dirty windshield can trap moisture, which can freeze overnight and make it difficult to clean your windshield in the morning. Make sure to clean your windshield regularly and use a windshield cleaner that is designed to remove dirt, grime, and other debris.
9. Replace Your Windshield Wipers

If your windshield wipers are old or worn out, they may be more prone to freezing. Consider replacing your windshield wipers with a new set, especially if they are leaving streaks or not cleaning your windshield properly. Make sure to choose a set of wipers that are appropriate for the temperatures in your area.
Conclusion
Dealing with frozen windshield wipers can be frustrating, but there are steps you can take to prevent them from freezing. Park your car in a garage or undercover area, lift your wipers, cover your windshield, use a de-icer, turn off your wipers before turning off your car, use a windshield washer fluid with de-icer, don't use hot water, keep your windshield clean, and replace your windshield wipers. By following these tips, you can keep your windshield wipers from freezing and make it easier to clean your windshield in the winter.
Related video of How To Prevent Windshield Wipers From Freezing

Introduction
Mosquito bites are common during the summer, and they can be itchy and uncomfortable. Mosquitoes can also transmit diseases like malaria, dengue fever, and Zika virus. It is important to take steps to prevent mosquito bites to avoid these health risks. In this article, we will discuss how to prevent itching mosquito bites.Wear Protective Clothing
One of the best ways to prevent mosquito bites is to wear protective clothing. Long-sleeved shirts, long pants, and socks can all help to prevent mosquito bites on exposed skin. You can also wear clothing that is treated with insect repellent, which can provide additional protection.
Use Insect Repellent
Insect repellent is another effective way to prevent mosquito bites. You can use a variety of insect repellent products, including sprays, lotions, and wipes. Look for products that contain DEET, picaridin, or oil of lemon eucalyptus, as these ingredients are most effective at repelling mosquitoes.
Avoid Peak Mosquito Hours
Mosquitoes are most active during dawn and dusk, so it is best to avoid spending time outside during these hours. If you do need to be outside during peak mosquito hours, be sure to wear protective clothing and use insect repellent.Eliminate Standing Water
Mosquitoes breed in standing water, so it is important to eliminate any standing water around your home. This includes emptying any water in flower pots, bird baths, and other containers. You should also make sure that your gutters are clean and free of debris.
Use Mosquito Nets
If you are camping or sleeping outside, mosquito nets can provide protection from mosquito bites. Mosquito nets can be hung over a bed or placed over a tent to provide a barrier between you and the mosquitoes.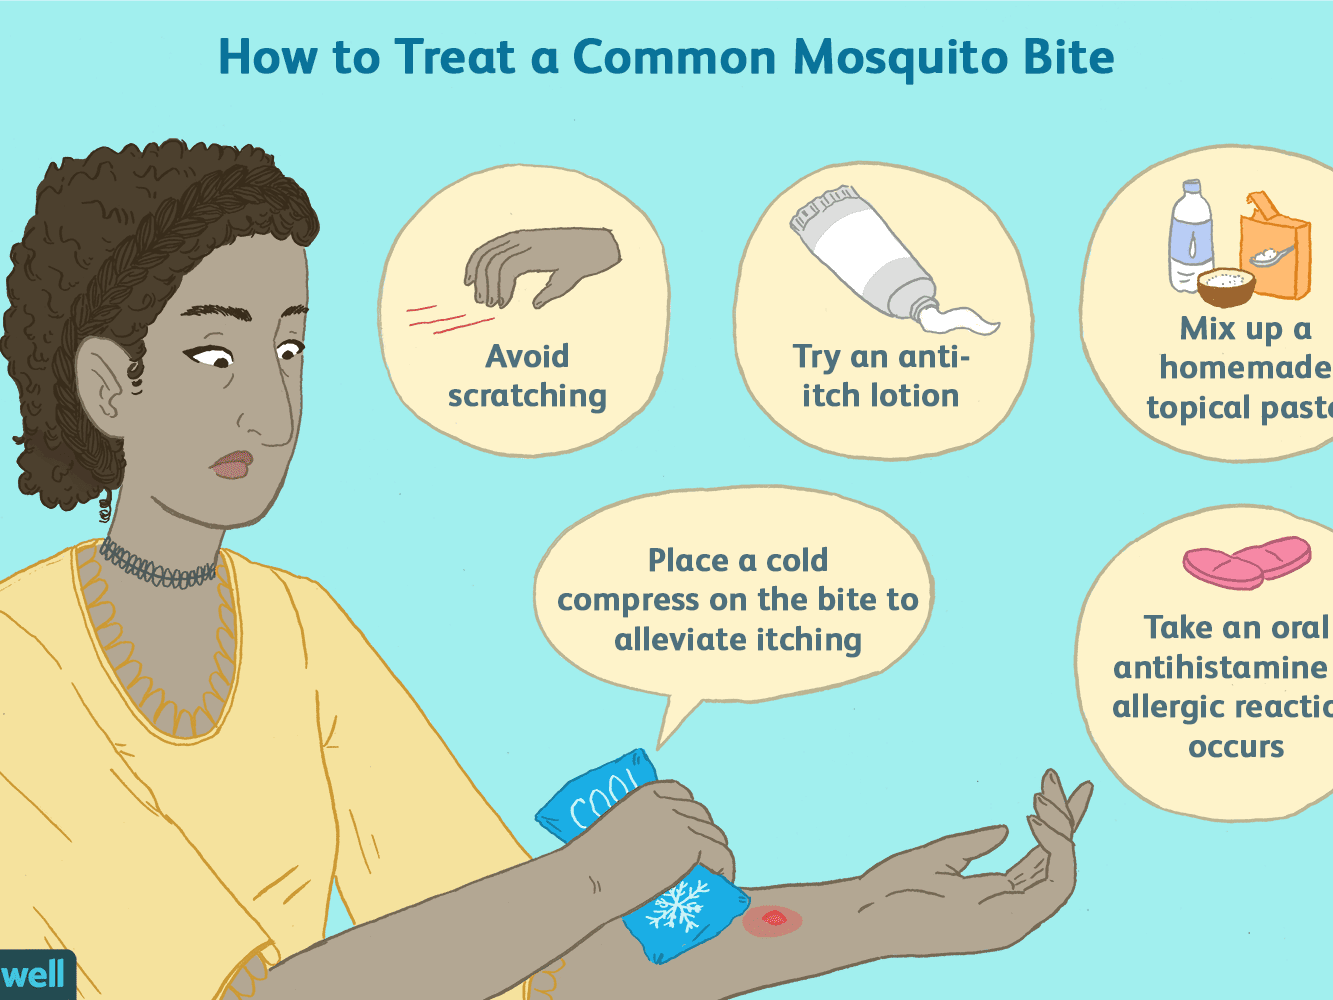
Keep Your Home Clean
Mosquitoes can breed in dirty or cluttered areas, so it is important to keep your home clean and clutter-free. This includes regularly cleaning your gutters, removing any debris from your yard, and keeping your home free of trash.
Stay Cool
Mosquitoes are attracted to warm bodies, so it is important to stay cool to avoid attracting mosquitoes. You can do this by staying in air-conditioned areas or using fans to circulate air. You can also take cool showers or baths to lower your body temperature.
Use Essential Oils
Some essential oils, like lavender, citronella, and peppermint, can help to repel mosquitoes. You can use these essential oils in a diffuser or mix them with a carrier oil and apply them to your skin.
Take Antihistamines
If you do get mosquito bites, taking antihistamines can help to reduce itching and swelling. You can also apply a cold compress to the affected area to reduce inflammation.
Avoid Scratching
It can be tempting to scratch mosquito bites, but this can make the itching worse and increase the risk of infection. Instead, try applying a topical anti-itch cream or taking a cool shower to reduce itching.
Conclusion
Mosquito bites can be itchy and uncomfortable, but there are many ways to prevent them. By wearing protective clothing, using insect repellent, and eliminating standing water, you can reduce your risk of mosquito bites. If you do get mosquito bites, taking antihistamines and avoiding scratching can help to reduce itching and swelling. By following these tips, you can enjoy the outdoors without the annoyance of mosquito bites.Related video of How To Prevent Itching Mosquito Bites

“Tears in Heaven” is an iconic song by Eric Clapton, released in 1992. The song was written as a tribute to Clapton’s son, who tragically passed away at the age of four. The song won three Grammy awards and remains one of Clapton’s most well-known pieces.
Tuning

Before you start playing “Tears in Heaven,” it’s important to ensure that your guitar is properly tuned. The song is played in the key of A major, which means that you’ll need to tune your guitar to the following notes:
- Low E string: A
- A string: E
- D string: A
- G string: A
- B string: C#
- High E string: E
Chords

“Tears in Heaven” uses four chords: A, E, F#m, and D. Here’s how to play each chord:
- A: Place your first finger on the second string, second fret. Place your second finger on the fourth string, second fret. Place your third finger on the third string, second fret.
- E: Place your first finger on the third string, first fret. Place your second finger on the fifth string, second fret. Place your third finger on the fourth string, second fret.
- F#m: Place your first finger on the second string, first fret. Place your second finger on the third string, second fret. Place your third finger on the fourth string, second fret.
- D: Place your first finger on the third string, second fret. Place your second finger on the first string, second fret. Place your third finger on the second string, third fret.
Strumming Pattern

The strumming pattern for “Tears in Heaven” is relatively simple. It’s just a basic down-up pattern, with a slight emphasis on the upstroke. Here’s what the pattern looks like:
Down, up, down, up, down, up, down, up
Playing the Song

Now that you have the chords and strumming pattern down, it’s time to start playing “Tears in Heaven.” The song is played in the following order:
- Intro: A, E, F#m, D
- Verse: A, E, F#m, D (repeat twice)
- Chorus: A, E, F#m, D (repeat twice)
- Verse: A, E, F#m, D (repeat twice)
- Chorus: A, E, F#m, D (repeat twice)
- Solo: A, E, F#m, D (repeat twice)
- Chorus: A, E, F#m, D (repeat twice)
Conclusion
Learning to play “Tears in Heaven” can be a rewarding experience for any guitar player. By following the tuning, chords, strumming pattern, and song structure outlined in this article, you’ll be well on your way to mastering this beautiful song.
Related video of How to Play Tears in Heaven

CPR stands for cardiopulmonary resuscitation. It is a life-saving technique used to revive a person whose breathing or heartbeat has stopped. It involves chest compressions and mouth-to-mouth breathing. Knowing how to perform CPR can help save someone’s life. Here’s how to do it.
1. Assess the Situation

The first thing you need to do is assess the situation. Check if the person is unconscious and not breathing. If the person is breathing, then call for medical help. If they are not breathing or have an irregular heartbeat, then start CPR immediately.
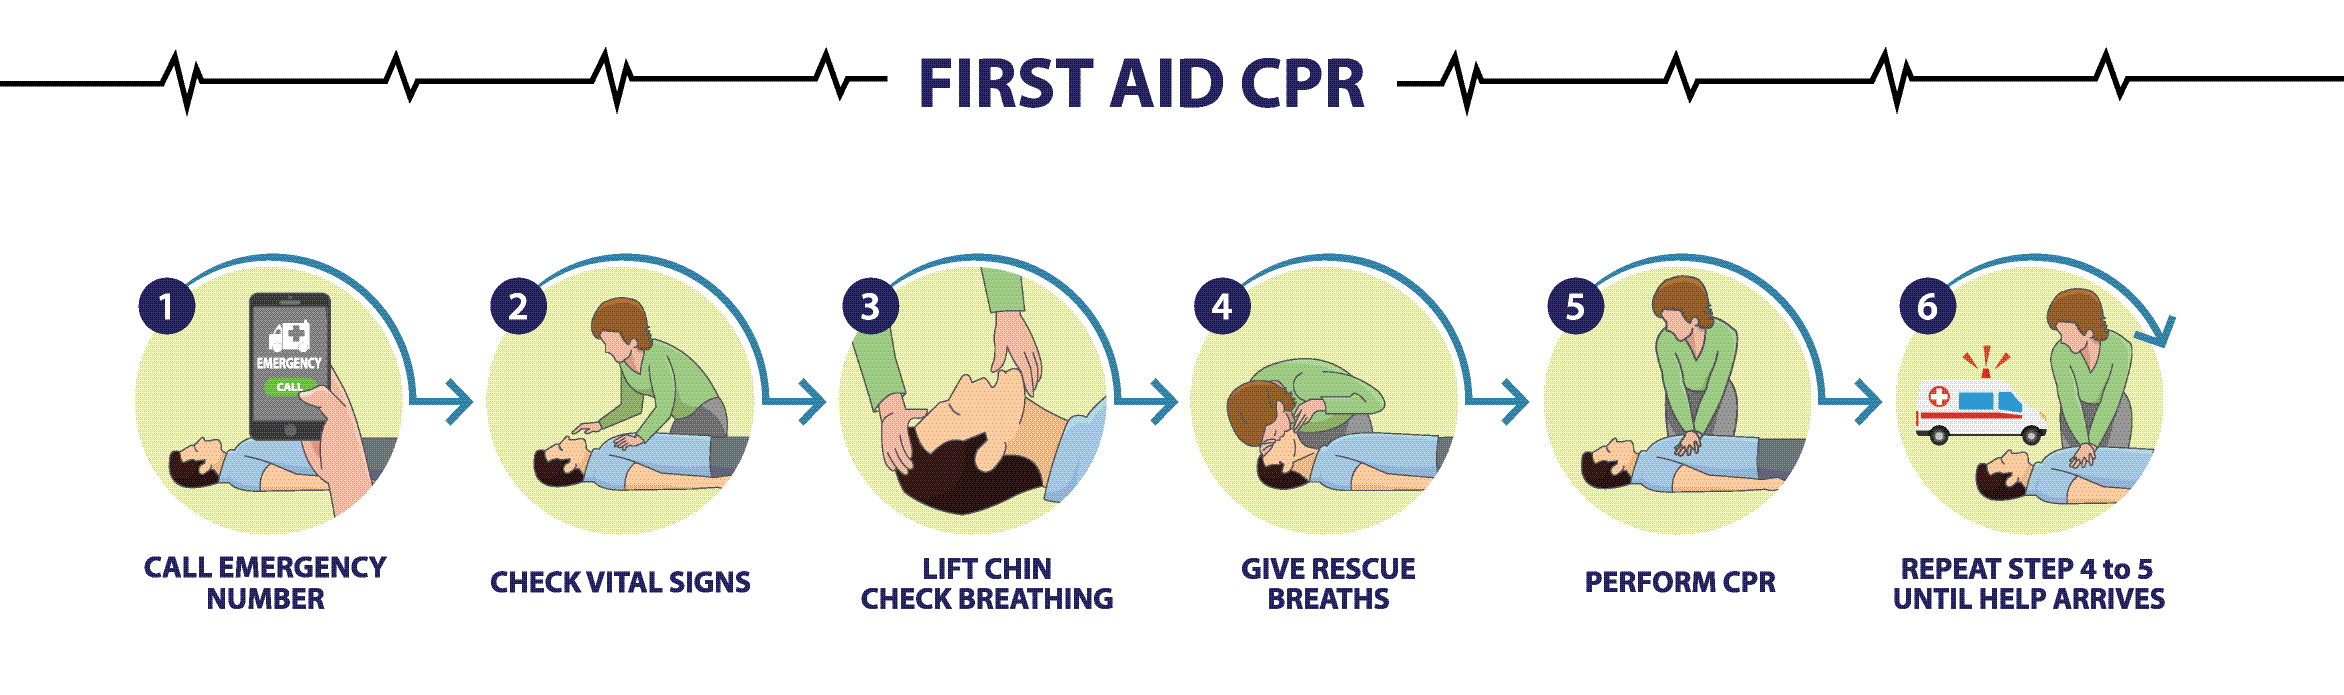
2. Call for Help

Before starting CPR, make sure someone has called for medical help. If you are alone, call for help yourself. Time is of the essence in such situations, so do not delay calling for help.
3. Position the Person

Lay the person on a flat surface facing upwards. This should be done on a hard surface like the floor. If the person is lying on a bed or a couch, move them to the ground before starting CPR.
4. Check Their Airway

Check the person’s airway to make sure it is clear. Tilt their head back and lift their chin to open their airway. If there is something blocking their airway, such as food or vomit, remove it carefully.
5. Give Mouth-to-Mouth Breaths

Pinch the person’s nose closed and give them two breaths by blowing air into their mouth. Make sure the person’s chest rises with each breath. If the person’s chest does not rise, then the airway may be blocked. Check the airway again and give two more breaths.
6. Give Chest Compressions
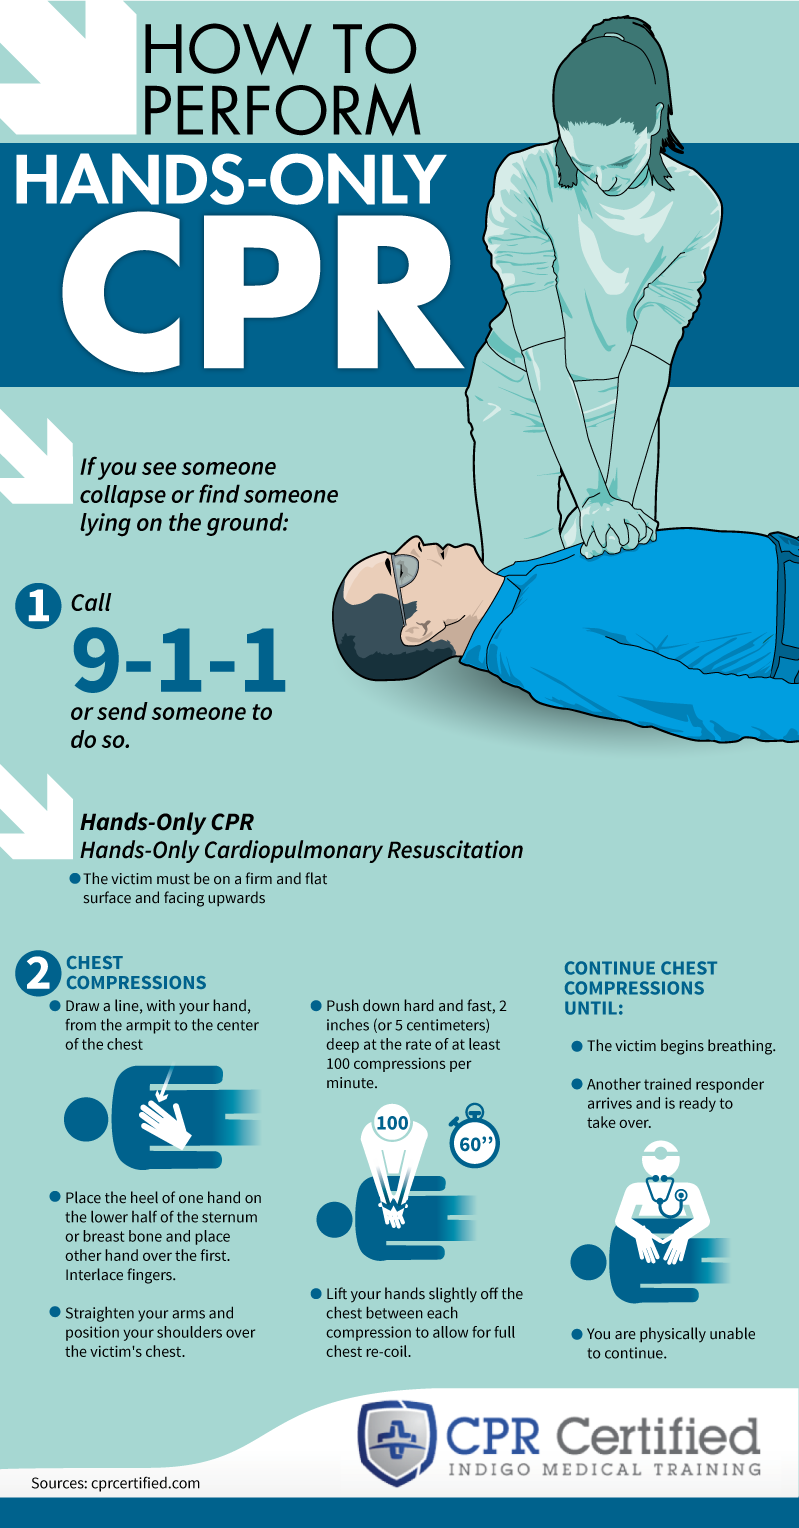
Place the heel of your hand on the center of the person’s chest, between the nipples. Place your other hand on top of the first hand. Lock your elbows and use your upper body weight to push down on the person’s chest. Give 30 chest compressions at a rate of 100-120 per minute.
7. Repeat the Process

Repeat the cycle of two breaths followed by 30 chest compressions. Continue until the person starts breathing on their own or medical help arrives. If you get tired, switch with someone else if there is another person available to help.
8. Do Not Stop Unless the Person Starts Breathing

Do not stop doing CPR until the person starts breathing on their own or medical help arrives. Even if the person’s heartbeat returns, they may still not be breathing on their own. Continue CPR until medical help arrives.
9. Be Prepared to Use an Automated External Defibrillator (AED)

If an AED is available, use it as soon as possible. An AED is a portable device that can deliver an electric shock to the heart to restore its normal rhythm. Follow the instructions on the AED carefully.
10. Stay Calm and Focused
In an emergency situation, it can be easy to panic. However, it is important to stay calm and focused. Take deep breaths and follow the steps of CPR carefully. Remember that you are doing your best to help save someone’s life.
Conclusion
CPR is a life-saving technique that can help revive a person whose breathing or heartbeat has stopped. It involves chest compressions and mouth-to-mouth breathing. Knowing how to perform CPR can help save someone’s life. Remember to stay calm, call for help, and follow the steps of CPR carefully.